
Locally means something unusual for LongCat-2.5. Meituan put the weights on Hugging Face on November 9, 2026, under the MIT licence, and the model card gives one deployment route: NPU platforms, through a project called SGLang-FluentLLM. There is no Nvidia guide in the card, no GGUF file, and no laptop version waiting to be found. Our news report on Meituan releasing LongCat-2.5 without Nvidia covers how the model was trained. This tutorial covers what running it on your own hardware actually takes.
The scale is the story. LongCat-2.5 holds 1.6 trillion parameters in total, with about 48 billion active for each token. Active is not the same as resident. Every expert has to sit in memory, ready for the router to call it. The guide this tutorial follows loads the real weights on a cluster of 194 Ascend cards, and it says so in its second section, before any command appears. Read that table first. If the hardware is not there, the honest move is to stop at Step 1 and use the hosted chat or API instead.
What You’ll Build or Learn
You will end with LongCat-2.5 serving image and text requests from your own Atlas A2 cluster, behind one HTTP endpoint that speaks the OpenAI chat format. The deployment splits the work three ways, in an arrangement the guide calls EPD. A standalone Encoder service turns images into tokens. Prefill nodes read the prompt. Decode nodes write the answer. A small load balancer, MiniLB, sits in front and takes the requests.
You will also learn where the limits sit. The NPU guide covers the W4A4 build only. W4A4 means the expert weights and activations run as 4 bit integers, a format the card says domestic accelerators compute natively. Meituan reports that this build keeps accuracy close to the full model on its own evaluated benchmarks, and those figures are company figures. Our research review of the LongCat-2.5 agent model on Ascend weighs those claims in full.
Before You Begin
Three facts shape everything that follows. First, the guide deploys the W4A4 build, from the separate Hugging Face repo named LongCat-2.5-W4A4. It does not give an NPU route for the BF16 weights. Second, the serving code lives on a branch, not on the main line. The branch is named longcat-2.5-npu in the SGLang-FluentLLM repo, and the main branch Quick Start targets Nvidia H20 and H800 cards instead. Code from the wrong branch will not run this model on an NPU. Third, the nodes need password free SSH access from one distribution node, rsync on every node, and the cluster network files the guide names, including /etc/hccn.conf on each NPU node. Set those up before the start scripts run, not while they fail.
This tutorial follows the guide as published and does not claim a live run. No Ascend cluster sits in this office, and a tutorial that pretends otherwise would be lying about the one thing that matters here. Every command below comes from the model card or the NPU guide, checked on November 15, 2026.
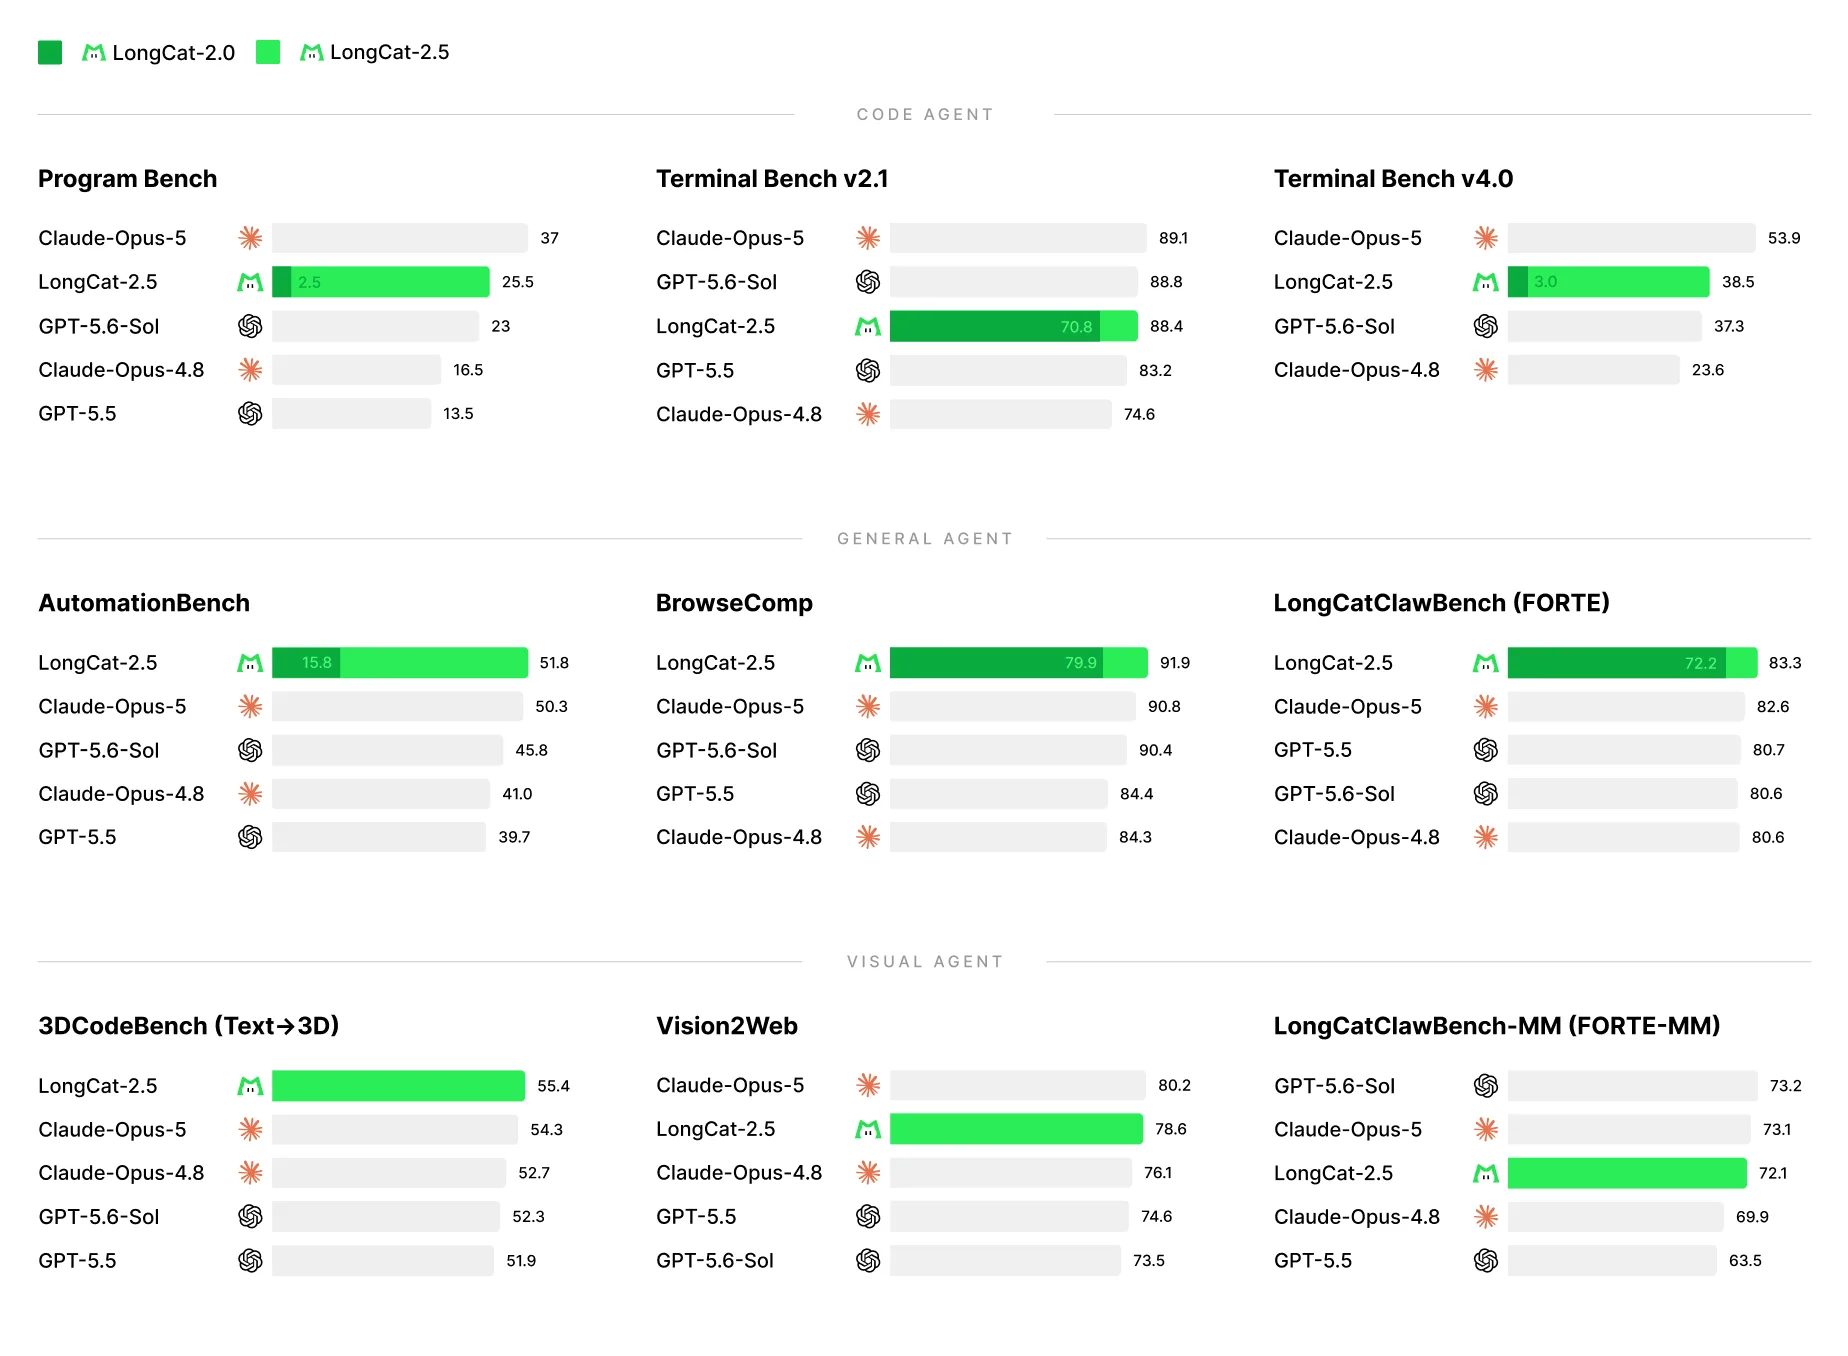 The model card charts, from Meituan. Scores without an asterisk are Meituan figures measured in house, and the card calls them indicative only. Image: Meituan
Step 1: Audit the Hardware Against the Documented Scale
Action: count your cards and compare them with the deployment table in the NPU guide before touching any software. The guide loads real weights, not a test subset, and its table reads as follows.
| Role | Cards | What it does |
|---|---|---|
| Encoder | 2 | Turns image input into tokens the language model can read |
| Prefill | 64 | Reads the prompt and builds the first state |
| Decode | 128 | Writes the answer, token by token |
| Total | 194 | Atlas A2 cards, in nodes of 16 cards each |
The node list in Step 6 makes the same point in a second form. The start script expects 8 Decode nodes first, then 4 Prefill nodes. At 16 cards per node, that is the same 128 and 64. The Encoder runs apart, on 2 cards of its own.
Expected result: your cluster matches the Atlas A2 series and the card count, or you stop here. A smaller Atlas A2 setup has no documented path in this guide. The guide gives no reduced scale option, no single node option, and no partial weight option. Teams without the hardware still have the hosted route at longcat.ai, which the model card links as its chat site.
Step 2: Install the Driver and the CANN Stack
Action: install the platform software in the order the guide gives. Start with the Ascend HDK driver, version 25.0.RC1.1, or the driver the CANN compatibility document pairs with CANN 9.0.0. Then install three CANN packages in matched versions: the toolkit package, the 910b operator package, and the NNAL package that carries the ATB acceleration library. The guide names the file shapes directly: Ascend-cann-toolkit_${version}_linux-${arch}.run, Ascend-cann-910b-ops_${version}_linux-${arch}.run, and Ascend-cann-nnal_${version}_linux-${arch}.run. It points to the CANN install document for the install method itself, so follow that document rather than guessing flags.
Next, install Ascend Extension for PyTorch. The guide requires the torch_npu and torchair builds matched to PyTorch 2.9.0 and CANN 9.0.0. Version drift at this layer is the classic Ascend failure. A torch_npu build made for a different CANN release will import, then fail later in ways that point at your model code instead of the mismatch.
Expected result: every node carries the same driver, the same CANN version, and the same PyTorch pair. Check one node, then check that the rest match it exactly. The guide states the rule plainly for its kernel builds, and it holds for the whole stack: same source version, matched to each node’s chip, CPU architecture, and Python and PyTorch setup.
Step 3: Clone the NPU Branch and Install Its Python Dependencies
Action: download the serving code and switch to the NPU branch before installing anything from it. The guide gives this order.
git clone https://github.com/meituan-longcat/SGLang-FluentLLM.git
cd SGLang-FluentLLM
git checkout longcat-2.5-npu
pip3 install -r ./npu_test/requirements.txt --no-deps
The --no-deps flag is in the guide, and it matters. It installs the listed packages without letting pip pull a second, unmatched set of platform libraries over the stack you built in Step 2.
Expected result: the working tree sits on the longcat-2.5-npu branch, and the requirements install completes without replacing torch or torch_npu. If pip reports that it changed either one, rebuild that node from Step 2. The branch name is also your receipt. The multimodal EPD support for this model exists on this branch, per the branch notes, and not in the main line engine.
Step 4: Build and Install the Custom Kernels
Action: build the flash-npu-kernel package from the project root. This is the longest step, and the guide splits it into three builds that must all land: a CANN operator package, then two Python wheels. Load the build setup first.
source "${ASCEND_TOOLKIT_ENV:-/usr/local/Ascend/ascend-toolkit/set_env.sh}"
source "${ATB_ENV:-/usr/local/Ascend/nnal/atb/set_env.sh}"
: "${ASCEND_HOME_PATH:?Load the CANN setup first and set ASCEND_HOME_PATH}"
python3 -m pip install setuptools wheel ninja
If your CANN setup script lives at /usr/local/Ascend/cann/set_env.sh, set ASCEND_TOOLKIT_ENV to that path first, as the guide notes. Then build and install the CANN operator package for the Atlas A2 chip, named ascend910b in the build command.
cd flash-npu-kernel/cann-flash-ops
bash build.sh -c ascend910b
bash "output/CANN-flash-ops-linux.$(uname -m).run" --quiet --install-path="${ASCEND_HOME_PATH}"
source "${ASCEND_HOME_PATH}/vendors/flash_ops/bin/set_env.bash"
Then build the two Python packages. The guide warns that flash_ops and flash_npu_kernel are two different packages and each needs its own install. It also warns that the first build script only builds its wheel, with the install line commented out, so the explicit pip line below is what actually installs it.
cd flash-npu-kernel/cann-flash-ops/torch_ops_extension
bash build_and_install.sh
python3 -m pip install --force-reinstall --no-deps dist/flash_ops-*.whl
cd flash-npu-kernel/flash_ops
bash build.sh
python3 -m pip install --force-reinstall --no-deps dist/flash_npu_kernel-*.whl
Run those builds from the right folders, returning to the project root between them as your own shell discipline requires. Then run the check the guide gives.
python3 -c "import torch, torch_npu, flash_ops, flash_npu_kernel; print('NPU available:', torch.npu.is_available())"
Expected result: the import line runs and reports that an NPU is available. Repeat the whole step on every inference node, with the same source version on each. Every node that later serves the model also needs the CANN setup, the ATB setup, and the flash_ops setup file loaded in its start setup. The guide calls this out for batch SSH starts in particular, where the remote shell starts with none of them loaded.
 Encoder, Prefill, and Decode run as separate services in this deployment, linked across the cluster network. Illustration: Dirty Static
Step 5: Download the W4A4 Weights
Action: download the W4A4 weights to a local path every serving node can reach, using the method the guide gives. It uses the Hugging Face command line tool and the W4A4 repo, not the BF16 repo.
pip install -U huggingface_hub
mkdir -p /data/meituan-longcat
hf download meituan-longcat/LongCat-2.5-W4A4 --local-dir /data/meituan-longcat/LongCat-2.5-W4A4
The Encoder needs its own matching weights as well. Step 7 points the Encoder service at an Encoder weight path, so fetch the Encoder weights the guide’s example names and place them at the path you will use there.
Expected result: the W4A4 folder sits complete at the path you will name as MODEL_PATH in Step 6. The guide requires that path to be absolute, with no spaces and no wildcard characters. Check the folder size against the repo listing before going further. A partial download that passes a casual look will fail hours later, at model load, on 194 cards at once.
Step 6: Set the Cluster Variables
Action: on the distribution node, set the four values the start script reads. The guide fixes both the names and the order rules, and the order rule is the part people get wrong.
export MODEL_PATH=/data/meituan-longcat/LongCat-2.5-W4A4
export ENCODER_URLS=http://encoder-node0:9101
export iplist="decode-node0 decode-node1 decode-node2 decode-node3
decode-node4 decode-node5 decode-node6 decode-node7
prefill-node0 prefill-node1 prefill-node2 prefill-node3"
export testpath=/data/longcat25
export time=longcat25
The iplist order is fixed: the first 8 hosts are Decode nodes, the last 4 are Prefill nodes. Names must resolve and reach each other across the cluster. ENCODER_URLS takes comma separated HTTP addresses with no spaces. The guide adds three practical rules here. Set SSH_USER and SSH_PORT if the defaults of your current user and port 22 do not fit. Keep testpath apart from the source folder, and use a fresh target folder for each new version, so files from an older build cannot linger inside a new one. Make sure the HCCL, Gloo, and Mooncake network settings match your cluster network, and that the Encoder HTTP path, the encoded result path back, and the Prefill to Decode KV transfer path can all reach each other.
Expected result: the start, startp, and startd actions have both MODEL_PATH and ENCODER_URLS set, which the guide requires, and the status and log actions have the node list they need.
Step 7: Start the Encoder
Action: on the Encoder node, from the project root, point MODEL_PATH at the Encoder weights and start the Encoder service.
export MODEL_PATH=/data/meituan-longcat/LongCat-2.5-Encoder
export ENCODER_NPU_DEVICES=0,1
bash npu_test/flash26b/run_encoder_epd.sh
The guide gives the defaults worth knowing before you change any of them. The Encoder uses a tensor parallel size of 2, serves HTTP on port 9101, and outputs a format it names rvq_indices. The port can move through ENCODER_HTTP_PORT if 9101 clashes on your network.
Expected result: the Encoder answers on its health path, which the Verification section checks. Start nothing else until it does. Prefill and Decode take the Encoder address as a setting, and a missing Encoder turns into prompt failures that look like model failures.
Step 8: Distribute the Code and Start Prefill, Decode, and MiniLB
Action: return to the distribution node, set the Step 6 variables again with MODEL_PATH pointing at the W4A4 weights, and preview the start before running it. The guide builds a dry run mode into the script, and on a cluster of this size the preview is not optional caution. It is the cheapest review the commands will ever get.
DRY_RUN=1 bash npu_test/flash26b/run_pro_w4a4kv8_mm_epd.sh start
bash npu_test/flash26b/run_pro_w4a4kv8_mm_epd.sh code
bash npu_test/flash26b/run_pro_w4a4kv8_mm_epd.sh start
The code action copies the code to each Prefill and Decode node, into the testpath folder, using rsync. The start action then launches Prefill, Decode, and MiniLB. MiniLB starts on the last Prefill node in your list, on port 8081 by default. The script also takes startp to start only the 4 Prefill nodes plus MiniLB, startd to start only the 8 Decode nodes, and an optional second value as a log tag, which the log actions then need to match.
The guide names the start settings so you can spot them in the logs. Prefill and Decode start with W4A4 weights, KV cache in INT8, NEXTN style MTP speculative decoding, and the flags --enable-multimodal --language-only. That last flag confuses people at first read. It means the Prefill and Decode nodes run the language part only, because the separate Encoder from Step 7 does the visual work. The whole service still answers image requests. Prefill runs with pipeline parallel 8 and attention tensor parallel 8. Decode runs with KV parallel 8, data parallel 16, and expert parallel 128.
Expected result: the start completes across all 12 serving nodes. If the code already sits at the same path on every node from a prior run, the guide says you may run start directly and skip the code action.
Verification
Check the result in the order the guide gives, from the outside in.
First, ask the script for status, and read the node logs it points to. Logs sit on each node in the testpath folder, in a file named for your time tag.
bash npu_test/flash26b/run_pro_w4a4kv8_mm_epd.sh status
Second, look for the success line the guide names. On both the Decode and the Prefill rank 0 nodes, a good start ends with this line in the log.
INFO - The server is fired up and ready to roll!
Third, check all three health paths. The Encoder has its own port, and Prefill and Decode share a different one.
curl --fail http://encoder-node0:9101/health
curl --fail http://prefill-node0:6080/health
curl --fail http://decode-node0:6080/health
Fourth, send a real image request to MiniLB, at the address of the last Prefill node, on port 8081. Replace the image address with one your cluster can reach. The default served model name is LongCat-2.5.
export service_ip=prefill-node3
curl -X POST http://${service_ip}:8081/v1/chat/completions \
  -H "Content-Type: application/json" \
  -d '{
    "model": "LongCat-2.5",
    "messages": [
      {"role": "user", "content": [
        {"type": "text", "text": "Describe this image."},
        {"type": "image_url", "image_url": {"url": "https://example.com/image.jpg"}}
      ]}
    ],
    "max_tokens": 1024,
    "temperature": 0.7,
    "stream": false
  }'
A JSON answer that describes the image, from your own endpoint, is the result the whole build aims at. For text only work after that, the model card shows the thinking controls worth knowing. LongCat-2.5 is a hybrid model. It takes enable_thinking set to True or False through the chat template settings in the request, and save_history_reasoning_content set to True keeps the reasoning text in the history, which the card recommends for better results with thinking on. The card’s own evaluation settings use thinking on, a temperature of 1.0, and a top_p of 0.95.
Troubleshooting
| Problem | Likely cause | Fix |
|---|---|---|
| The kernel import check fails on flash_ops or flash_npu_kernel | The two wheels are separate packages, and the first build script builds its wheel without installing it | Run the explicit pip install lines in Step 4 for both wheels, on the node that fails |
| The build stops on an ASCEND_HOME_PATH error | The CANN setup scripts were not loaded in that shell | Load the toolkit and ATB setup files first, exactly as Step 4 opens, then rerun |
| Prefill starts where Decode should be, or the reverse | The iplist order is wrong | Put the 8 Decode nodes first and the 4 Prefill nodes last, as Step 6 states, then restart |
| The Encoder health check fails | The Encoder service never started, or its port moved | Start the Encoder from Step 7 first, and check ENCODER_HTTP_PORT if you changed it from 9101 |
| The code action fails on some nodes | SSH or rsync is not ready between the distribution node and those nodes | Set up password free SSH, confirm host fingerprints, and install rsync on every node, as the guide requires |
| A node loads code from an older build | testpath still holds files from a prior version | Use a fresh testpath for the new version, apart from the source folder, as the guide advises |
| Requests reach MiniLB but image prompts fail | The Encoder path back to Prefill and Decode is blocked, or ENCODER_URLS names the wrong address | Check ENCODER_URLS against the live Encoder address and port, and confirm the encoded result path can cross the cluster network |
| A tool such as vLLM or llama.cpp will not load the weights | The model card documents no route through them | Use the SGLang-FluentLLM NPU branch in this tutorial. No other serving route is documented in the card |
Next Steps
Put a gateway you control in front of MiniLB before anyone outside the operations team touches the endpoint. The guide’s endpoint takes raw chat requests, and it has no account layer of its own. Rate limits, request logs, and access rules belong at that gateway, set by you.
Then record the exact build you ran: the CANN version, the driver version, the branch commit, and the kernel source version, per node group. On a cluster this size, the next upgrade is a rebuild, and the team doing it will need to know which matched set produced a working service. When a newer branch lands, treat it as a new deployment. Fresh testpath, fresh dry run, same health checks in the same order.
Facts checked November 15, 2026, against the LongCat-2.5 model card on Hugging Face and the NPU deployment guide in the SGLang-FluentLLM repo, longcat-2.5-npu branch. This tutorial follows those documents and does not claim an end to end run on our own hardware.
Sources
- Model size, active parameters, W4A4 quantization, thinking mode settings, evaluation settings, and the NPU deployment pointer: LongCat-2.5 model card, Meituan on Hugging Face
- Deployment scale, hardware and software requirements, CANN and kernel builds, weight download, cluster variables, Encoder and Prefill and Decode start scripts, health checks, and the sample image request: LongCat 2.5 W4A4 NPU deployment guide, SGLang-FluentLLM
- The serving engine, its SGLang base, and the branch note for W4A4 multimodal inference on Ascend A2: SGLang-FluentLLM repository, Meituan
- W4A4 weights: LongCat-2.5-W4A4, Meituan on Hugging Face
- Benchmark chart in the body: Meituan, from the model card above. Hero and EPD illustrations: Dirty Static.
END OF TRANSMISSION
Stay curious. Question everything.